Anime hair looks expressive and effortless, but that effect is built on a carefully planned anime hair base. This base is not a hairstyle — it’s a structural system used by professional anime artists to control volume, flow, and personality.
This guide explains anime hair bases using industry-backed design logic (no copy-paste tutorials). Use it as a reference, practice checklist, and quick data sheet for design decisions.
Table of Contents
What Does “Anime Hair Base” Actually Mean?
An anime hair base is the foundational structure that defines:
- Where hair grows from the scalp
- How it wraps around the skull
- How volume is distributed
- How do different hairstyles remain consistent on the same character
Professional anime artists treat the hair base as a reusable framework, not a finished drawing.
Why Most Anime Hair Drawings Fail Without a Proper Base
Primary cause: artists jump into details before establishing structure.
Common results of skipping a base:
- Hair floating above the head
- Random strand direction
- No sense of weight or balance
Fix: Establish a strong base that sets silhouette, volume, and growth direction first.
Who Uses Hair Bases in the Industry?
Common roles:
- Character designers
- Key animators
- Manga artists
- Game concept artists
Industry principle: “If the silhouette reads clearly, the hair works — even without detail.”
The Core Anatomy of an Anime Hair Base
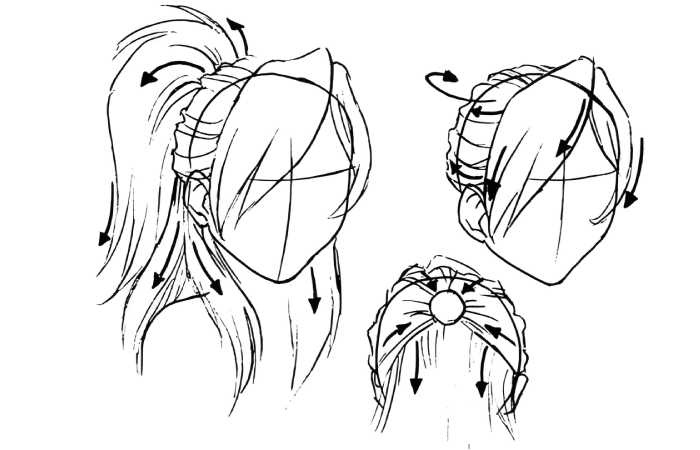
Head Volume
Hair must sit on the skull’s true volume. Ignoring the head structure makes the hair look pasted on.
Hairline Mapping
Anime hairlines are stylized but logical.
Key anchor points:
- Centre hairline
- Temple breaks
- Sideburn origins
These anchors control realism, even in exaggerated styles.
Root → Body → Tip Structure
| Zone | Purpose | Common Character Use |
|---|---|---|
| Root | Direction & growth logic | Youthful, friendly |
| Body | Volume & silhouette | Energetic, action-focused |
| Tip | Motion & expression | Mature, stylish |
This three-zone approach prevents visual chaos: block big shapes first, refine details later.
Hair as Shapes, Not Strands
Anime hair is designed using shape grouping, not individual strands.
Why this works:
- The human eye reads silhouettes first
- Shapes communicate personality
- Too many strands destroy clarity
Strands are added last, only to support the base.
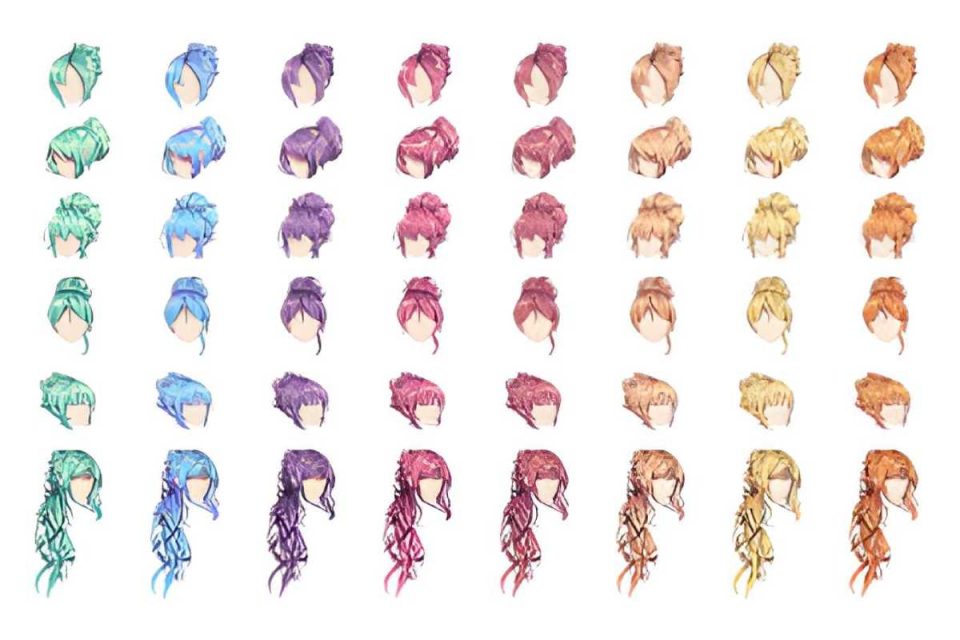
Common Anime Hair Base Types & Use Cases
| Base Type | Structural Logic | Common Character Use |
|---|---|---|
| Rounded | Even soft volume | Youthful, friendly |
| Spiked | Angular flow and pointed tips | Energetic, action-focused |
| Layered | Overlapping forms, staggered lengths | Mature, stylish |
| Minimal | Reduced forms, subtle silhouette | Background characters or soft looks |
Key insight: Most anime hairstyles come from 4–5 core bases, not dozens of unique designs.
Shape Popularity — Graph-Ready Data
Use this table or the simple bar chart below to understand which bases appear most often in anime-style designs.
| Hair Base Type | Relative Usage (approx.) | Percent |
|---|---|---|
| Rounded | High | 33% |
| Spiked | High | 33% |
| Layered | Medium | 22% |
| Minimal | Lower | 12% |
Case Studies: Same Base, Different Results
Case Study 1: Spiked Base
Used frequently for:
- Shōnen protagonists
- Competitive or impulsive characters
What changes the look: length, tip sharpness, and direction. Small shifts produce radically different silhouettes.
Case Study 2: Layered Base
Common in:
- Romance anime
- Slice-of-life genres
Layer overlap adds perceived complexity while preserving a simple structural base.
Studio note: Reusing base logic helps maintain consistency and speed across frames and characters.
Beginner Mistakes Specialists See Most Often
Typical mistakes and how to fix them:
| Mistake | Correct Approach | Typical Character Outcome |
|---|---|---|
| Drawing strand-by-strand | Block large shapes first | Youthful, friendly |
| Ignoring skull volume | Map head volume, fit hair to skull | Energetic, action-focused |
| Over-detailing early | Grayscale shape blocking, add strands last | Mature, stylish |
| Perfect symmetry with no intent | Introduce intentional breaks and flow | More believable characters |
How Anime Artists Practice Hair Bases
Common practice steps:
- Silhouette-only sketches (quick read)
- Grayscale shape blocking (value & volume)
- Multiple bases on one head (explore options)
- Canvas flipping to check the balance
This workflow beats copying finished hairstyles — it trains structural thinking instead of surface replication.
Quick Checklist: Drawing an Anime Hair Base
| Step | Why it matters |
|---|---|
| Map skull volume | Anchor everything to a believable head |
| Draw centre hairline & anchors | Guides growth and parting |
| Block root & body shapes | Create silhouette & weight |
| Check silhouette readability | Silhouette must read at thumbnail size |
| Add tip direction & sparsely placed strands | Provide motion without clutter |
Final Thoughts: Why the Hair Base Matters More Than Style
Anime hair isn’t about copying designs — it’s about understanding structure. Master these three fundamentals and every hairstyle you draw will feel intentional and consistent:
- Head volume
- Hairline logic
- Shape grouping